simpson pressure washer manual
Simpson Pressure Washer Manual: A Comprehensive Guide
This manual provides essential guidance for Simpson pressure washers, covering models from 3000 PSI/2.4 GPM to 4400 PSI/4.0 GPM, ensuring optimal performance and longevity.
Understanding Your Simpson Pressure Washer
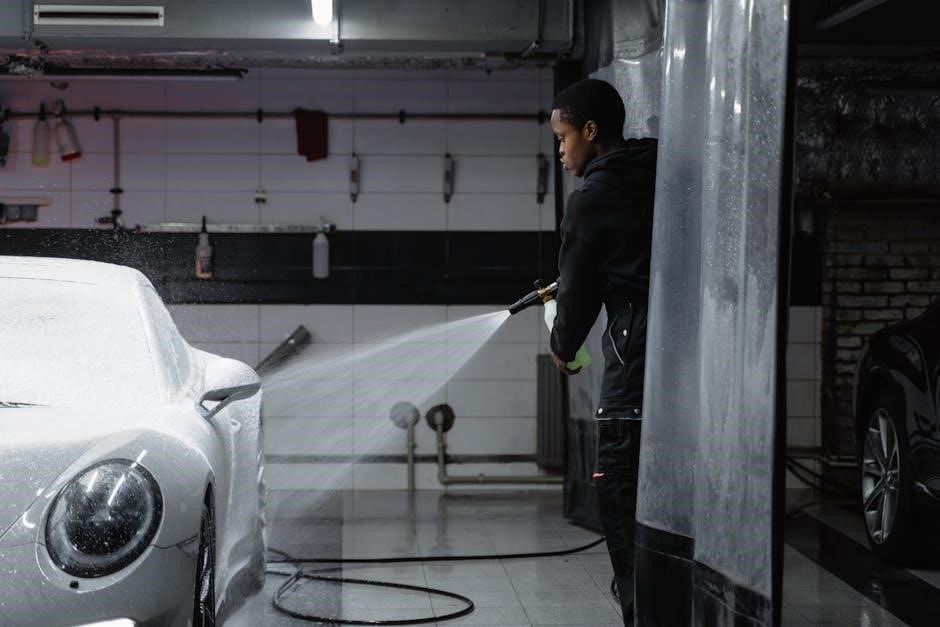
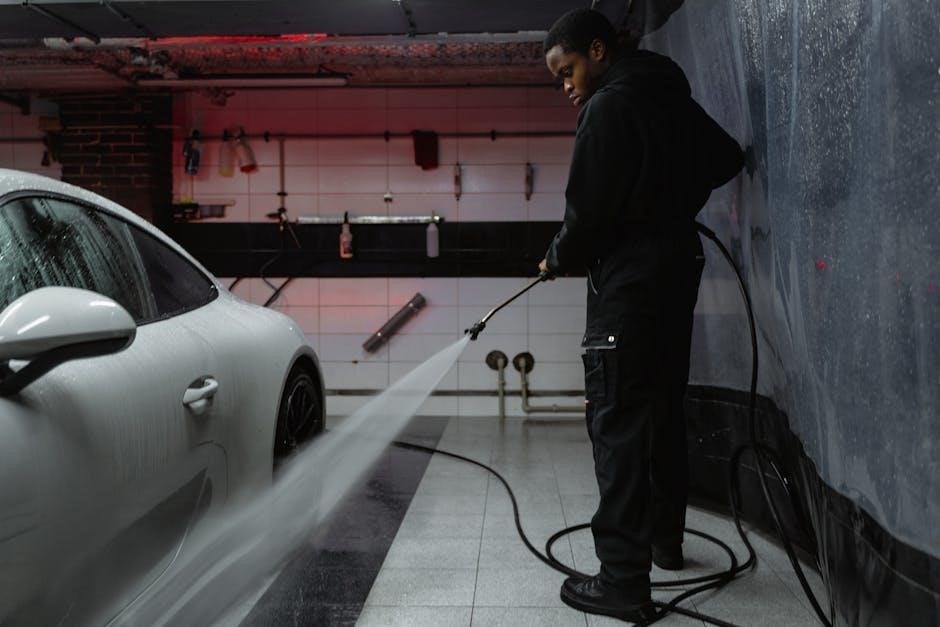
Simpson pressure washers are powerful cleaning tools designed for a variety of tasks, from washing vehicles and siding to preparing surfaces for staining or painting. Understanding the core principles of operation is crucial for safe and effective use. These machines utilize a high-pressure water stream to dislodge dirt, grime, and other debris.
The cleaning power is determined by two key specifications: PSI (pounds per square inch) and GPM (gallons per minute). Higher PSI indicates greater force, while higher GPM signifies a larger volume of water delivered. Simpson offers models ranging from 3000 PSI/2.4 GPM for lighter duties to 4400 PSI/4.0 GPM for more demanding applications.
Proper nozzle selection, detailed later in this manual, significantly impacts cleaning effectiveness. Familiarizing yourself with the different nozzle types and their spray patterns will allow you to tailor the pressure and coverage to the specific cleaning task at hand. Always remember to prioritize safety and follow the precautions outlined in the dedicated safety section.
Model Identification and Serial Numbers
Accurate model and serial number identification is vital for accessing correct parts, warranty service, and support documentation. The model number typically indicates the pressure washer’s capabilities, such as PSI and GPM ratings. This information is usually found on a permanently affixed data plate located on the machine’s frame or engine housing.
The serial number is a unique identifier for your specific unit, crucial for tracking manufacturing date and any previous service history. It’s often located near the model number on the same data plate. For example, machines with serial numbers 101225 to 710889 utilize a specific pump type (7106161) and pump kit (7104979) for 3000 PSI/2.4 GPM models.
When contacting Simpson customer support or ordering replacement parts, always have both the model and serial number readily available. This ensures you receive the correct components and assistance tailored to your particular pressure washer. Keep this information recorded in a safe place for future reference.
Safety Precautions and Warnings
Prioritize safety when operating your Simpson pressure washer. High-pressure water can cause serious injury if misused; Always read and understand this manual before operation. Never point the wand at yourself or others. Wear safety glasses or goggles to protect your eyes from debris.
Ensure a stable footing and maintain a firm grip on the spray gun. Avoid operating the pressure washer while fatigued or under the influence of drugs or alcohol. Disconnect the power source (for electric models) or fuel supply (for gas models) before performing any maintenance or repairs.
Be mindful of bystanders and keep children and pets away from the operating area. Never alter the factory-set safety features. Inspect hoses and connections for damage before each use. Properly ground electrical connections to prevent shock hazards. Failure to follow these warnings could result in severe injury.
Component Overview
Your Simpson pressure washer consists of several key components working in unison. These include the engine (gas models) or electric motor, a high-pressure pump, a welded steel frame for durability, and a shipping box for protection during transport (model 7107325). The pump, crucial for generating pressure, varies by model – 7106161 for 3000 PSI/2.4 GPM and 7104979 for specific ranges.
Essential accessories include the high-pressure hose, various nozzles for different cleaning applications, and a spray gun. The machine serial number identifies your specific unit and is vital for warranty claims and parts ordering. Understanding each component’s function is key to safe and effective operation. Refer to the parts diagram for a visual representation of these elements.
Pressure Washer Parts Diagram
The parts diagram is a visual key to understanding your Simpson pressure washer’s anatomy. It clearly illustrates the location of each component, from the engine or motor and high-pressure pump (identified by part numbers like 7106161 and 7104979) to the spray gun, hose, and various nozzles;
Key areas highlighted include the pump assembly, the trigger mechanism on the spray gun, and the connection points for the high-pressure hose. The diagram also showcases the welded steel frame, providing structural support. Referencing this diagram during assembly, maintenance, or troubleshooting is highly recommended. It aids in identifying parts for replacement and understanding how everything fits together, ensuring proper functionality and safe operation. A separate manual (7104573) may offer model-specific details.
Nozzle Selection and Usage
Choosing the correct nozzle is crucial for effective and safe cleaning. Simpson pressure washers utilize a color-coded nozzle system, each delivering a different spray pattern and intensity. A 0-degree nozzle provides a concentrated, powerful stream for stubborn stains, while a 40-degree nozzle offers a wider, gentler spray for more delicate surfaces.
Understanding the relationship between pressure (PSI) and flow (GPM) is key. Higher PSI, coupled with appropriate nozzle selection, delivers superior cleaning power. Always start with a wider-angle nozzle and gradually increase the intensity if needed. Incorrect nozzle usage can damage surfaces or cause injury. Never point a high-pressure nozzle at people, animals, or electrical equipment. Regularly inspect nozzles for wear and tear, replacing them as needed to maintain optimal performance.
Assembly Instructions
Before operating your Simpson pressure washer, proper assembly is essential for safe and efficient use. Carefully unpack all components and verify that all parts listed in the manual are present. Begin by attaching the handle to the main unit, securing it with the provided bolts and ensuring a firm grip. Next, connect the high-pressure hose to both the pump and the spray gun, tightening the connections by hand – avoid using tools to prevent damage.
Proper connection of accessories is vital. Attach the desired nozzle to the spray gun, ensuring it clicks securely into place. Double-check all connections for leaks before proceeding. Refer to the parts diagram for correct component placement. Incorrect assembly can lead to malfunctions or safety hazards. Always consult the manual if you encounter any difficulties during the assembly process.
Connecting the High-Pressure Hose
Securely attaching the high-pressure hose is crucial for safe operation. First, locate the hose connection port on the pump and the spray gun. Ensure both connections are clean and free of debris. Hand-tighten the hose fittings to the pump and spray gun, rotating clockwise until snug. Do not overtighten, as this can damage the fittings or the hose itself.
Inspect the hose for any kinks or damage before connecting it. A damaged hose can burst under pressure, posing a safety risk. Once connected, gently pull on the hose at both ends to confirm a secure fit. If leaks are detected, disconnect the hose and re-tighten the connections. Always prioritize a leak-free connection to maintain optimal pressure and prevent water loss.
Attaching Nozzles and Accessories

Proper nozzle attachment dictates cleaning effectiveness. Simpson pressure washers utilize a quick-connect system for easy nozzle changes. Before attaching, ensure the unit is switched off and the water supply is disconnected. Align the nozzle with the spray gun’s nozzle receiver and firmly push until it clicks into place. Verify a secure connection by gently attempting to pull the nozzle off.

Different nozzles offer varying spray patterns – from wide-angle for gentle cleaning to narrow-angle for concentrated power. Select the appropriate nozzle based on the surface being cleaned. Accessories, like soap applicators, attach similarly. Always refer to the accessory’s instructions for specific guidance. Incorrect attachment can lead to reduced performance or damage.
Operating Instructions
Before operation, thoroughly review all safety precautions. Ensure the pressure washer is on a stable, level surface. Connect the water supply, verifying adequate pressure (minimum 20 PSI recommended); For gas models, follow the ‘Starting the Engine’ procedure precisely, checking oil levels beforehand. Never operate a dry unit – always prime the pump according to the instructions.
Once running, gradually adjust the pressure settings using the pressure control knob. Start with a lower setting and increase as needed, testing on an inconspicuous area first. Maintain a consistent distance from the cleaning surface. Regularly inspect the high-pressure hose and connections for leaks or damage. Avoid directing the spray at electrical components or people.
Starting the Engine (Gas Models)
Prior to starting, confirm the oil level is correct and the fuel tank contains fresh gasoline. Ensure the choke is set to the ‘start’ position (typically fully closed) for cold starts. Turn the ignition switch to ‘on’ and pull the starter cord firmly and smoothly. Avoid rapid, jerky pulls. Once the engine sputters, gradually open the choke.

Continue pulling the starter cord until the engine runs consistently. Allow the engine to warm up for a few minutes before engaging the pump. If the engine fails to start after several attempts, check the spark plug and fuel line. Never add fuel while the engine is running or hot. Always disconnect the spark plug wire before performing any maintenance.
Water Supply Connection
Before operation, securely connect a water supply hose to the water inlet on the pressure washer. Ensure the hose is of adequate diameter (typically 5/8 inch) and free from kinks or obstructions. A garden hose with a brass fitting is recommended. Never use a damaged or worn hose, as this could lead to leaks or reduced pressure.
Turn on the water supply fully. The pressure washer is designed to draw water from a municipal water source or a static water source like a tank. If using a static source, ensure the inlet hose is fully submerged and the water is clean and free of debris. Check for leaks at all connections before starting the engine.
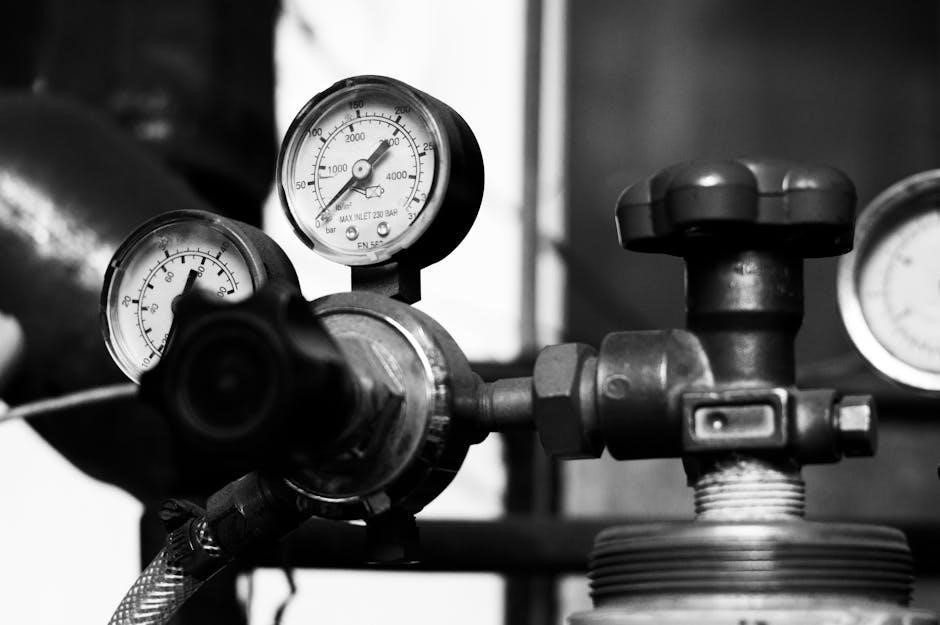
Adjusting Pressure Settings
Simpson pressure washers offer adjustable pressure settings to accommodate various cleaning tasks. Begin with the lowest pressure setting and gradually increase it as needed, testing on an inconspicuous area first. Higher pressure is suitable for tough surfaces like concrete, while lower settings are ideal for delicate materials like painted wood or vehicles.
Pressure adjustment is typically achieved using a pressure regulating knob or dial located near the pump. Refer to your specific model’s diagram for the exact location. Understand that a combination of pressure (PSI) and flow (GPM) determines cleaning effectiveness. Always prioritize safety and avoid exceeding the recommended pressure for the surface being cleaned to prevent damage.
Maintenance and Troubleshooting
Regular maintenance is crucial for extending the life of your Simpson pressure washer. A routine schedule should include checking oil levels (gas models), cleaning nozzles, and inspecting hoses for wear and tear. Proper storage during off-season, draining water to prevent freezing, is also vital.
Common issues include ‘no start’ problems, often due to low oil or a clogged fuel filter. Low pressure can stem from a restricted nozzle, kinked hose, or pump issues. Consult the troubleshooting section for specific solutions. Always disconnect the power source or spark plug before performing any maintenance. If problems persist, contact a qualified technician for assistance, ensuring safe and effective operation.
Routine Maintenance Schedule
To ensure peak performance and longevity, adhere to this maintenance schedule. After each use, flush the pump with clean water to remove debris. Every 25 operating hours (or annually), check and change the engine oil (gas models), inspect the air filter, and clean the nozzles.
Every 100 operating hours, inspect the high-pressure hose for cracks or leaks, and check all fittings for tightness. Annually, replace the spark plug (gas models) and fuel filter. Periodically, clean the pump inlet screen. Always use Simpson-approved replacement parts. Maintaining these intervals will prevent costly repairs and maximize your pressure washer’s efficiency, ensuring reliable operation for years to come.
Cleaning and Storage
Proper cleaning and storage are crucial for extending the life of your Simpson pressure washer. After each use, disconnect the water supply and high-pressure hose. Flush the pump with clean water to remove any remaining detergent or debris, preventing corrosion. Wipe down the exterior of the unit with a damp cloth.
For long-term storage, drain all water from the pump and hose. Add pump protector to the pump inlet before the final run to lubricate internal components. Store the unit in a clean, dry, and frost-free location. Cover the pressure washer to protect it from dust and debris. Always refer to the full manual for detailed instructions and safety precautions before storage.
Common Problems and Solutions (e.g., No Start, Low Pressure)
If your Simpson pressure washer fails to start, check the fuel level (gas models) and ensure the spark plug is clean and properly connected. Verify the engine’s on/off switch is in the ‘on’ position. For low pressure issues, inspect the nozzles for clogs and clean or replace them as needed. Ensure the water supply is fully open and the intake hose isn’t kinked.
A pulsating spray could indicate air in the system; turn off the unit and allow it to prime. If problems persist, consult the full manual for detailed troubleshooting steps. Remember to disconnect the power source before any inspection or repair. Always prioritize safety and seek professional assistance if you’re uncomfortable performing repairs.
Pump Information and Specifications
Simpson pressure washers utilize robust pumps designed for varying levels of cleaning power. Models with serial numbers 101225 to 710889 typically feature a 3000 PSI, 2.4 GPM pump, identified by part number 7106161, with a corresponding pump kit 7104979. Later models, from 715754 onwards, often incorporate a 3100 PSI pump and beyond.
Higher-end units, like the PS60843, boast a powerful 4400 PSI, 4.0 GPM capability. Understanding these specifications – PSI (pounds per square inch) and GPM (gallons per minute) – is crucial for selecting the appropriate pressure for different cleaning tasks. Refer to your specific model’s documentation for precise pump details and compatibility information. Proper pump maintenance ensures optimal performance and extends the lifespan of your Simpson pressure washer.
Pump Type and Part Numbers (e.g., 7106161, 7104979)
Simpson pressure washers employ axial cam pumps known for their durability and efficiency. Identifying the correct pump type and part number is vital for maintenance and repairs. For machines with serial numbers ranging from 101225 to 710889, the standard pump is often the 7106161, delivering 3000 PSI at 2.4 GPM. Correspondingly, the recommended pump repair kit is 7104979, ensuring a complete restoration of pump functionality.
Newer models and those requiring higher performance may utilize different pump assemblies. Always consult your specific model’s documentation or the Simpson parts catalog to confirm compatibility. Using the incorrect pump or kit can lead to reduced performance or damage to the pressure washer. Accurate part numbers guarantee a proper fit and optimal operation, extending the life of your equipment.

PSI and GPM Ratings (e.g., 3000 PSI, 2.4 GPM, 3100 PSI, 4.0 GPM, 4400 PSI)
Understanding PSI (pounds per square inch) and GPM (gallons per minute) is crucial for selecting the right Simpson pressure washer for your needs. PSI determines the force of the water stream, impacting cleaning power, while GPM dictates the volume of water delivered, influencing cleaning speed and efficiency.
Simpson offers a range of models to suit various tasks. Entry-level models typically feature 3000 PSI at 2.4 GPM, suitable for light-duty cleaning like decks and patios. Mid-range options often provide 3100 PSI and 4.0 GPM, offering increased power for tougher jobs. For demanding applications, such as removing stubborn grime or paint, Simpson’s 4400 PSI at 4.0 GPM models deliver exceptional performance. Choosing the correct combination ensures effective cleaning without damaging surfaces.
Warranty Information
Simpson pressure washers are backed by a comprehensive warranty to ensure customer satisfaction and peace of mind. The standard warranty covers defects in materials and workmanship for a specified period, typically ranging from one to five years, depending on the model and component. Engine warranties are generally provided separately by the engine manufacturer, such as Briggs & Stratton or Honda.
Warranty coverage may vary based on the intended use of the pressure washer – residential versus commercial applications often have different terms. It’s essential to register your product promptly after purchase to activate the warranty. Keep your proof of purchase and refer to the warranty documentation for specific details, exclusions, and claim procedures. Contact Simpson’s customer support for assistance with warranty claims or questions.